Are you using ShopSite PRO to it’s fullest potential?

Reward Your Customers

Did you know ShopSite has a rewards program you can offer your customers? Why not have your customers feel special by being a “loyalty” customer!

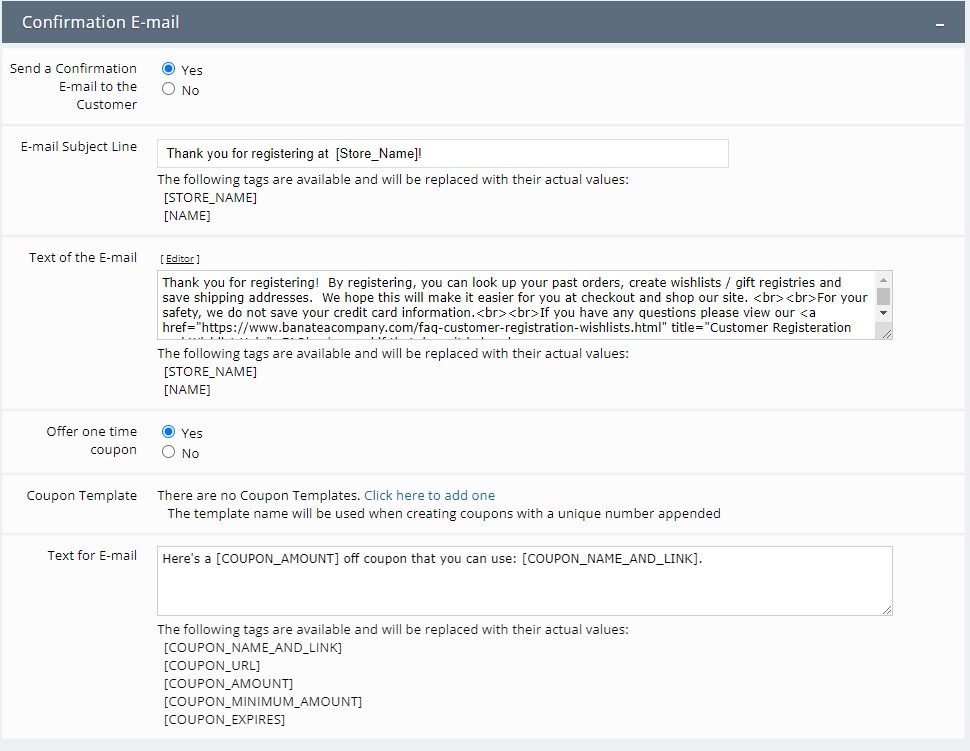
To do this, make sure you are using “customer registration”. You can then put your registered customers into groups. You can use these groups in a few different ways. Be sure to encourage your customers to create an account and become a registered customer … offer them a coupon to signup – this feature is found under customer registration > configure.

Assign Customers to a Group

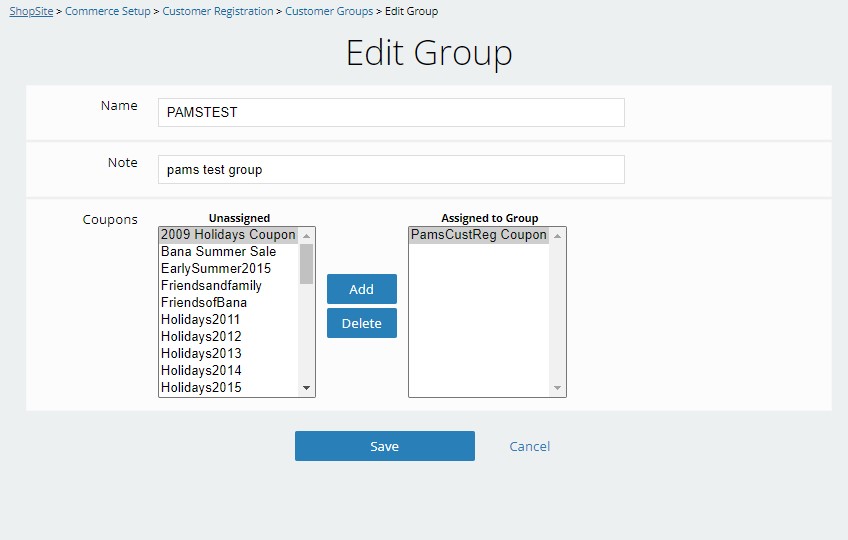
Easy-peasy: Go to commerce > customer registration , click on groups then add. Create as many groups as you want for as many reasons as you want. Maybe a group for frequent shoppers, maybe one for new customers to entice them to keep coming back. Think about what kind of customers you have and what you want to them to do.

Specialty Coupons

First create your coupons for your new customer groups: merchandising > coupons, add, save. Now go back to commerce > customer registration, groups, edit the group. Now assign the coupon(s) to the group, don’t forget to save. When your customer logs in now, they will see the coupons assigned to them.

Customer Rewards

Create a rewards program, something like:
– buy 10 get the 11th free
– buy 15 and get a different product free
– buy 20 pick from 5 different products to get free

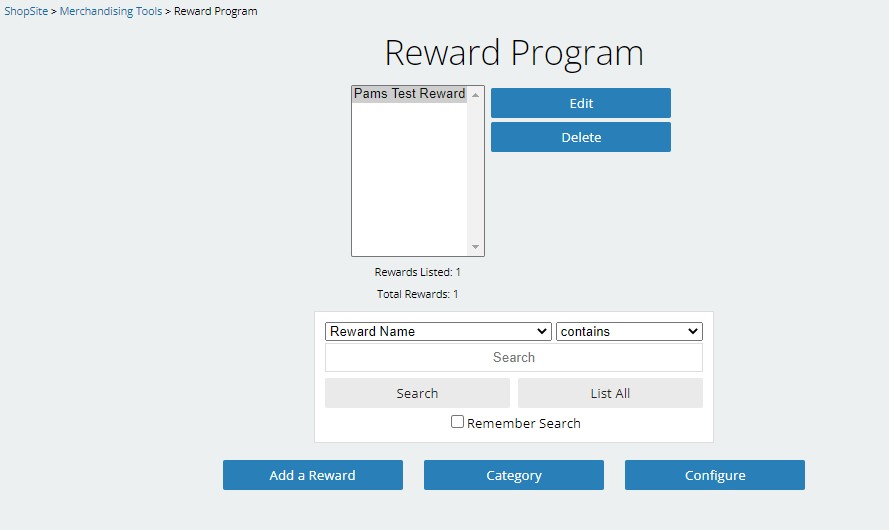
To create the reward, go to  merchandising > reward program you create a reward category (it has the items that qualify as being counted towards the reward) and a reward group (the items the customer can get free when they meet the reward).  As long as they login when they purchase, the system will keep count of how many they purchase automatically.  You don’t need to.  When they get to that quantity you assigned, they can add the “free” item to the cart and it will show up with a 0 price. 

Tips

Don’t forget the “Help” button in ShopSite. Use it when you are stuck directly from the area you need help with and it will take you directly to the help you need.

ShopSite’s help isn’t enough? Let me know, I’m glad to help. :0)

Download or Delete Products in ShopSite

Occasionally you may have the need to download and/or delete a set of products. Maybe you want to download the products to a spreadsheet so you can edit them and then reupload. Maybe you want to remove them from the store but there is the potential for putting them back. Here is how you can accomplish this task.

Let’s say you need to get products by brand. Of course, change the search to anything you can search by to get all the products you need.

To download all the products, in ShopSite do the following:
Go to Products
Search by Brand, contains [brand name]
Right below it in a link, click on “select all [number] matching products”
Click the image for download (down arrow)
Make sure the “all fields” is selected
Give it a file name that makes sense, save it with a .txt extension
Proceed

This will save it to your computer. You can then open it in excel and save it as an excel file.

This, however, does NOT save your pictures. If you need them, you want to download (ftp) them to your local computer or leave them on the server.

To delete the products, in ShopSite do the following:
Click the gear for “settings”
Scroll down to product deletion and check if you are deleting the product images. If it is checked, make sure to get the images before you delete the products. If unchecked, the images will remain in the media directory. NOTE: because of space limitations, I recommend saving the images locally so that you can delete them from the store and have this box checked.
Save changes (if you made any)
Go to Products
Search by Brand, contains [brand name]
Right below it in a link, click on “select all [number] matching products”
Click the trash can
Click yes to delete
Publish site

That’s it, your products will be deleted, but you will have a spreadsheet copy of them.

Certified ShopSite Designer & Developer!

We are happy to announce we have received our certification for Design and Development of sites using ShopSite, our favorite shopping cart!

We have been designing and developing sites using ShopSite for years, but just never applied for certification.  And we passed with flying colors.

Check out our portfolio page to see some of the sites we’ve designed/developed.  In need of a shopping cart, let us get you started.

ShopSite certified developer

ShopSite Certified Designer

How to add a Product to ShopSite

If you already have a store with products in it … here is the easiest way to add additional products if you want to add them one at a time:

Images:

  1. Create your images for your product.  Have these ready.  Create them at the highest size/resolution you need them online.  Upload them to ShopSite by going to Images.
  2. Images > click the directory you want  them in > upload images.
  3. If you need multiple sizes of images and use  different sizes, click on the button to create resized images > click proceed

Create the product:

  1. login to ShopSite, go to Products
  2. find a product that is very similar to the one you want to add, click on Copy
  3. Put in a product name and SKU > Save

Edit the new product:

  1. Go to the new product,  click on the product name to edit it.
  2. Change all fields necessary.  Be sure to review them all.
  3. Fields that copy over blank that you need to add something to:
    1. file name – be sure to give your product a descriptive file name, no unusual characters, just alpha numeric with hyphens, end with .html or .htm.
    2. product on pages – click this button to add your product to store pages
  4. Save
  5. publish
  6. MAKE SURE to verify your product is correct, view it in your store and add it to the cart to be sure it works as expected.

Pinterest Gifts Feed and ShopSite

Pinterest Gifts Feed

What is the Pinterest Gifts Feed?  Taken directly from the Pinterest site:

“We know people love to use Pinterest for shopping ideas, which is why we’ve created a new Gifts feed of all the different things you could buy.

The work-in-progress feed lives with our regular categories but it’s special because it only shows Product Pins. Product Pins show extra details like pricing, availability and where to buy right on the Pin so Pinners can decide which products are right for them.

So far, we’ve learned that Product Pins get higher click-through rates than regular Pins and make your brand more visible because of the logo on the Pin.  Pinners also get email notifications when Product Pins they’ve saved drop in price.

The Gifts feed also includes a few price filters so you can find something for every budget. $$$$ means the price is greater than $200, $$$ means the price is between $50-$200, $$ means the price is from $25 to $50 and $ is anything less than that.”

Certainly seems like something any seller would want to include with their products.

How do you do it?

PInterest requires you to have what they call “rich pins”.  Check out their developer page for more on this.  ShopSite makes it easy.  Using ShopSite’s custom templates, you can add the information to the head section of the product page and ShopSite will fill in the info for you that is required.  Keep your custom template clean by creating an “include” file that holds this information.  Then wrap product specific ShopSite tags with open graphic tags.  You then have to verify you have done this correctly with pinterest.

Oh, and an extra benefit … Google will also read this information and it will help them in displaying your pages in searches.  :O)

Happy pinning!

Extra Handling Charge in ShopSite

There are a couple different ways to add extra handling charges to the shipping calculation in ShopSite.  You first need to decide if you want these handling charges on a per unit basis or per order.

Handling Charge per unit (product): 

Login to ShopSite.  Go to products and select  any products you want to add handling for, click edit product info. Scroll down to the Shipping and Download Information section, it is called Extra Handling Charge.  Put in a dollar value here.

HINT:  If you are going to do it for every product, it is easy … Select all products by clicking on List All products then select the 1st, hold down the shift key and select the last to get them all.  Click on PowerEdit.  Under the Information column, pick Extra Handling Charge (only pick this).  Click the global radio button then proceed.  Add the $ amount.  Click save changes, publish.

You can also do it as an upload by creating a spreadsheet with the SKU and the handling charge.  Then upload this information at Utilities > Database > Upload  > Products.

Handling charge per Order:

Login to ShopSite.  Go to Commerce > Shipping.  Scroll down to the handling charges section.  Click the box to enable, then put in the value you want added to each order.  You may turn off handling charges if the subtotal of the order is over a certain amount.  Fill in this field if applicable.  If you are unsure how to use the calculation formula, click ShopSite’s help in the upper right hand corner for more information.

Getting the Most out of the Remaining Days till Christmas

increase holiday sales

Time for that last minute push for holiday sales!  Review why people are leaving items in their cart and not purchasing … is shipping too high?  Is your checkout procedure too complicated?

Consider “specials” to get your customer to stay and purchase more.  If there is only one item in the cart, consider offering a special coupon code if they purchase 2 or more … can be a percent off or free shipping.  This will often entice the visitor to look again.  Offer this code on the billing/payment information page so that if they don’t want to do it, they don’t have to and can still just check out.

Clearly state on your site when the last day is for Christmas delivery.  Offer next day or 2nd day shipping for an additional fee.

Offer gift cards or gift certificates.  This is GREAT for the last minute shopper.  Create a .pdf they can print out for the recipient of their gift so they have something to wrap if it is really last minute.

And lastly, be sure to checkout your own site and purchase something as though you were a shopper.  This way, you will know if there is anything that might need to be “cleaned up”.

Happy Holidays!

ShopSite Real-Time Shipping Quote System

If you use ShopSites UPS, USPS or FedEx real-time quote system (called API’s) this is a great feature from Lexiconn you will want to use.

Why was this developed?  As you may know if you use any of these services in ShopSite, if the service is down and you have not set up any other way for customers to pick shipping, they will not be able to place their order.  This is obviously very troublesome for customers.  Yes, you can have a flat fee table setup and turned on, but that means it is always turned on and may not give accurate information to customers when they are trying to pick shipping.

Lexiconn has created a new website, Shipping API Monitor, http://www.shippingapimonitor.com/ that can let you know when any of these services are down and also just as important, when the service is back up.  The site provides real-time tracking of the shipping API systems for rates being returned.  It monitors for their system being up and returning valid rates every minute from 2 geographically diverse locations. Any outage is displayed on the site, and after 3 consecutive rate failures, they mark the shipping API as down. You can find this out in a varied of ways … their website, an RSS feed, via email, via twitter.

Once you are notified the service is down, you can turn on your flat fee rate table that customers can use in lieu of getting a real time quote.  Yes, it won’t be exact shipping, but you won’t lose any sales this way.  Then when you are notified that the service is back up, you can turn this table off again.

Be proactive with your shipping systems and make sure your customers can purchase from you without problems this holiday season.  Go to Shipping API Monitor and signup to get an email,  follow them on twitter or get the rss feed.

Adding Pages to ShopSite

So you want to create a new page in your ShopSite store.  Maybe it is a category page, maybe just an informational page.  The EASIEST way to do this is to copy a page similar to the one you want to create.  Why? This is so that all the settings for the page will be copied over and you won’t need to worry about those.

Login to your store, click on Pages.  Find the page you want to copy and highlight it.  Then click on Copy Page.  Enter in the name for the new page and the file name.  For the file name, do not use blanks … just use alpha numeric and hyphens.  Make the page name make sense.  Click on copy and you will be taken back to the main List of Pages.

Find the name of the Page you just copied, highlight it and click on Edit Page Content.  Now you will be changing the content to be the new content from the page you copied from.  However, one field  does NOT copy over and you must REMEMBER to set it.

Links to Page.  This is the page you want this page to appear on.  Sometimes it doesn’t appear on a page, but ends up in a your custom navigation.  It is good to pick something so you can go see it … I recommend adding it to a testing page so you can verify what it looks like before it is actually added to the page(s) you want it on.

Not sure what a field is for?  ShopSite has a great help section.  Just click on the Help in the top menu (red circle with the ?).

Don’t forget to publish to have your page show up!  :O)

Affiliate Programs

Earn Money as an Affiliate
Earn $$ as an Affiliate

Many sites now have affiliate programs where you can advertise for them and earn a commission.  There are large companies that manage many affiliate vendors and if you become a member there you have many  companies at your disposal.  Or, if you use ShopSite, it has a built in affiliate program.

But as a manufacturer, how to decide if it is a good idea and how big do you go?  Look at your direct competitors … are they doing it? Look at the cost … how much does it cost you to maintain the program vs how much you get in increased exposure and revenue.  You must also be careful who you allow to be an affiliate.  If it is what is called a “coupon” site and they are your affiliate you may be paying out when really they didn’t give you any benefit.  How can this be?  Say a customer is on your site already.  But they think, hey, maybe I can find a coupon code.  They do a search for “coupon codes for X company”. They get to the coupon site, click the link for your store that looks like a coupon and really all that happens is the coupon site now gets a commission for referring that customer when they really didn’t.

With ShopSite you can run your own affiliate program.  You decide who gets in and you also decide how much commission each partner earns.  So you can have different earnings based on how large they are, if they are a website or blog or just send the link in email.  ShopSite creates reports that show you how much each affiliate earns. The only down side is that YOU maintain all of the program … meaning you must cut the checks to the participants.

Nelle and Lizzy just setup an affiliate program.  Stay tuned and we’ll let you know how it goes.  But for now, you can check out the pages created explaining the program and see if it might be something you’d want to try with your store.